Introduction
Welcome recruits, this is Battle School! Over the next series of lessons, Xoric, King of a Thousand Battles, will lead you to victory against the evil of the Catacomb Lords and their ilk. I aim to show you tactics and strategies that I’ve honed over many a pitched battle.
The one thing ole Xoric cannot teach you is practice. You aren’t out there pushing cubes, this is war! It is brutal and unforgiving. After the lessons you learn at each class, I recommend you try them out, teach the other members of your party, recreate some of the setups you see, or even create your own. It’s no fun coming back to town, beaten and bruised, dragging a cart of your fallen comrades around so figure out what works for you and you’ll go far.
Today’s lesson: The Alpha Strike
Today, I will talk about that critical first moment when encountering hostiles. Most monsters are as keen as they are cowardly so there is a fair chance that they heard you coming and set up into defensive positions. Hiding behind obstacles and rocks are a favorite tactic of these creatures so learning how to strike at them will be critical to your success on the battlefield. Luckily, we have just the thing to thin those ranks: the Alpha Strike.
The Alpha Strike is where you take an aggressive approach against the enemy and throw your best abilities at them to either remove the threats entirely or weaken the enemy so that their counter-attack is easily absorbed.
Probably the most legendary team to excel at the alpha strike is the one led by the Raven Empress herself, Maireya. Along with the Empress, Larra the Huntress, Elani the Thief, and Estie the Amazon round out this powerhouse group of evil bashers. The key here is high-powered, repeatable abilities.
Elani’s Shadowlithe Fist and Estie’s River Torrent form the brute force end while Larra and Maireya can handle crowd-control and constant damage.
Being an alpha strike, it works best the sooner you do it during the battle. Since the monsters are too busy cowering, we heroes usually have the option to charge in. I know this can sound like suicide but let’s take a look at a typical opening encounter:
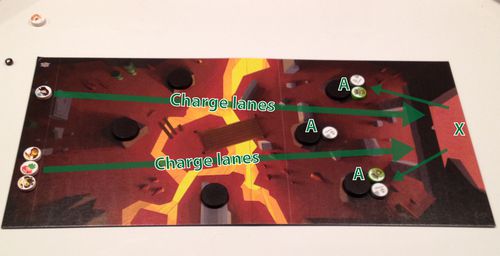
You can see the monsters (A) hiding among the rubble and obstacles while the heroes approach from the opposite side. The heroes could try to inch their way forward, using obstacles as cover but more likely than not, those hiding bastards will start ruining your day with arrows and rocks. Since most Catacomb Lords could care less about the fate of a single monster, they will throw endless waves of them at you to get you to leave them alone. That means time is on their side. The longer they hole up on the battlefield, the more likely they are to find a champion among their ranks who gets a lucky shot with a stone and knocks out one of your friends.
Instead, you need to take the fight to them and you do so by looking for the open lanes you have on the battlefield. I’ve marked them above as your “charge lanes” and they’ll differ from encounter to encounter. They are your most open and direct route to get at the exposed side of the monsters and your goal is to get to that open side (X) and hit them while they are exposed.
The Empress’ team will show you a quick and dirty way to get this accomplished.
Almost makes you feel sorry for the buggers. In any case, Raven Empress and company removed the monstrous threat in one round without leaving anyone left for retaliation. You’ll notice that they didn’t hold anything back and spent their abilities right away. This is the best way to get the most out of those abilities. It won’t do you any good to save them for later in the encounter when most of the monsters are dead or fleeing.
You might look at that battlefield and think that you can’t make that charge all the way down. As you may have noticed, not all the heroes were able to cleanly get down the field but even catching an obstacle or two can leave you with attack options.
In this next example, the Empress and Co. take on a level 1 room:
As you can see, the charge lanes were a little different in this encounter. The side lanes offered the most flexibility while Estie (whose River Torrent ability gives her the most maneuverability) takes the harder center lane. The team could have likely defeated more of the monsters in that alpha strike but looked at the monsters and prioritized down on the ones that could give them the most fuss later on. Ghouls, with their ability to deal out more than 1 damage and stun you, became the priority targets.
As it is, the most the remaining monsters could muster is 3 damage if they focused down on a hero (likely Estie, using the Blood Skulls to frighten her into the path of the other monsters). The heroes would then easily finish off the remaining monsters and move on.
Finally, we have the Empress’ group fully decked out and assaulting the Monoliths to Xokarst (Level 2). The heroes found old Izchak and grabbed a Stone Hammer for Elani, a Helm of Rage for Estie, and Vampire Blade for Maireya.
Again, only going through the initial alpha strike but you can see the writing on the wall in that room. Those monsters were broken and likely only dishing out a few more damage to the team before they get swept aside in the next round.
That should be enough for today. If you find yourself in trouble against the forces of darkness, give a few of these ladies a call to give you a hand. Next lesson will be applying these techniques to us “mortal” heroes. I know we can’t all be gods on the battlefield like these ladies but there are still things we can take away from their example and use in our own encounters. Until then, stay calm and rage on.
Wait, that didn’t even make sense…
How useful was this article?
Click on a star to rate it!
Thank you for your feedback.
How can we improve this article?