Introduction
Welcome back Heroes! Xoric, King of a Thousand Battles, here to expand on the Alpha Strike lessons we learned last time. This time we’ll look at how to approach the Alpha Strike when you don’t have the same skills as the Raven Empress and her friends.
Today’s lesson: Cooperative Alpha Strike
The key to the Alpha Strike, as we saw last time, is getting into a position that offers immediate attacks on your enemy. We saw a few of the best heroes doing this (Maireya, Larra, Estie, and Elani) but many of the other heroes also have the ability get around a monster’s initial defensive position. While they are not as overtly obvious as the lessons we learned last time, these “cooperative” Alpha Strikes are still important, especially early on in your adventure when you haven’t had time to purchase better weapons from Izchak.
There are two styles of of cooperative Alpha Strikes and they both revolve around using your teammates to get positional advantage. These cooperative techniques can be split into two categories: positional techniques and disruptive techniques. Positional techniques usually involve a hero that uses their abilities to get the rest of the party into striking position. I usually refer to this hero as the “anchor” since they tend to end up near the start zone after getting their comrades into position. Disruptive techniques involve a highly maneuverable hero pushing into the backfield and knocking the enemy out of position or putting enemies into exposed spots where the rest of the team can pick them off easier.
We’ll start off with Disruptive Alpha Strikes. The master of positional disruption is Roosan, the Chicken Champion. When he unleashes his Feathers of Fury, there is virtually no defense that the Overseer sets up that can’t be affected.
Going back to the Level 0 image we saw last time, the Disruption Alpha Strike needs charge lanes to get to an angle that can force the monsters from their hiding spots.
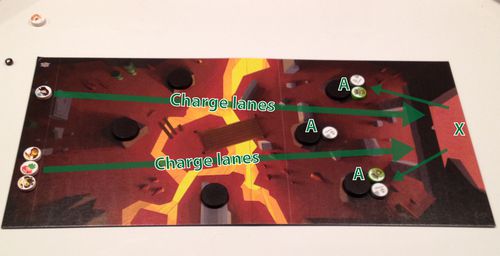
Roosan used the charge lanes to get to the backfield and used additional rush shots to force monsters out into direct attack lanes. The rest of the team then picked off these open monsters, leaving the first room with only a couple of hits. Roosan can decide how far he wants to push his luck by either using all his ability to disrupt monster positions or save the last rush shot to get back to cover.
Elani can accomplish the same effect but usually resulting in only getting a monster or two out into the open. Any hero that can chain two heavy shots together can work with this style of disruption. The shot disc only needs to be heavy enough to move a monster out of position so Katrine’s Ice Blast works well (rush > Ice shot) but Oleira’s Elven Arrow (rush > Missile shot) doesn’t.
The opposite of the Disruption Alpha Strike is the Positional Alpha Strike. The Positional Alpha Strike is the more basic, yet more difficult technique to use effectively. The benefit though is any Hero can use this technique but the more shots a hero can perform, the better. This shot has one Hero set up in an Anchor position behind his teammates and attempts to push them farther down the board, at angles that give them better attack options.

Any hero that can excel at the disruptive technique can use the positional technique and sometimes this can be a safer option than rushing out into the thick of a monster den, hoping to dislodge those entrenched bastards.
As you can see from the set up, we play where all the discs must be completely within the start zone. The more freedom you allow players in the set up, the easier Anchor set ups become.
The results were pretty much inline with the disruptive techniques and the heroes will take only a little damage before moving on to the next room.
Oakhearth Hall is easily the most difficult Level 0 room in the game. It actually is much closer to the set up of a Level 1 room but lacks the ability to place level 3 monsters. Even with that working against the Heroes, using a combination of positional and disruptive techniques, they are able to reduce the effectiveness of the initial monster force by half.
Since these techniques use the board edge (ie. Discs will likely end up off the board most of the time), care must be taken to not shoot your anchor in front of your teammates unless going for a specific set up. The Overseer is the final arbitrator on this so making sure the shot is obvious will help leave the final placements in your favor.
As you can see from the demonstrations, these cooperative alpha strikes can help eliminate a good portion of the initial threats in a room. Once your heroes get access to critical shot weapons, the techniques can scale to the more difficult rooms and help you succeed in taking even the greenest of heroes through to defeat the Catacomb Lord.
Ah! Another notch on the blade and this tale is done. I’ll turn the next session over to Varesh so he can teach about some gobbity-gooky hocus mumbo-jumbo. Good luck…
Sadly, Xoric, not everything can be solved by bashing your head against a tree.
Tell me about it!
How useful was this article?
Click on a star to rate it!
Thank you for your feedback.
How can we improve this article?